

Demystifying Myrtles: Pruning Lagerstroemia
By Taylor Lewis, nursery manager
Months of color, drought-tolerant, Valley-appropriate, fast-growing, easy-care — these traits are a few reasons that crape myrtles (Lagerstroemia indica), and their many cultivars, have become one of the most widely used home landscape, commercial, parking lot, median strip, landscape trees in the Sacramento Valley. So, what’s the mystery?
Crape myrtles' growth habits can cause many horticultural headaches. The Lagerstroemia ‘Tuscarora’ (seen below) is in its most dormant state, which happens to be when I prefer to prune.
We’re going to work on a couple specimens today. I’ll go step by step through my process. They’ve both had previous pruning work for size, shape and structure and still need pruning nearly every winter. You’re probably thinking, “But, Taylor, that tree looks fine to me,” and I’d mostly agree. We’ve been opening the middle and spacing branches for years and still, we need to clean it up.

Crape myrtle seed pods
Is it necessary to prune off the seed pods? The seed pods of a Crape myrtle inspire me to prune. I think they’re unsightly and whatever bird food that was there has already fallen to the ground. Prune the husks off.
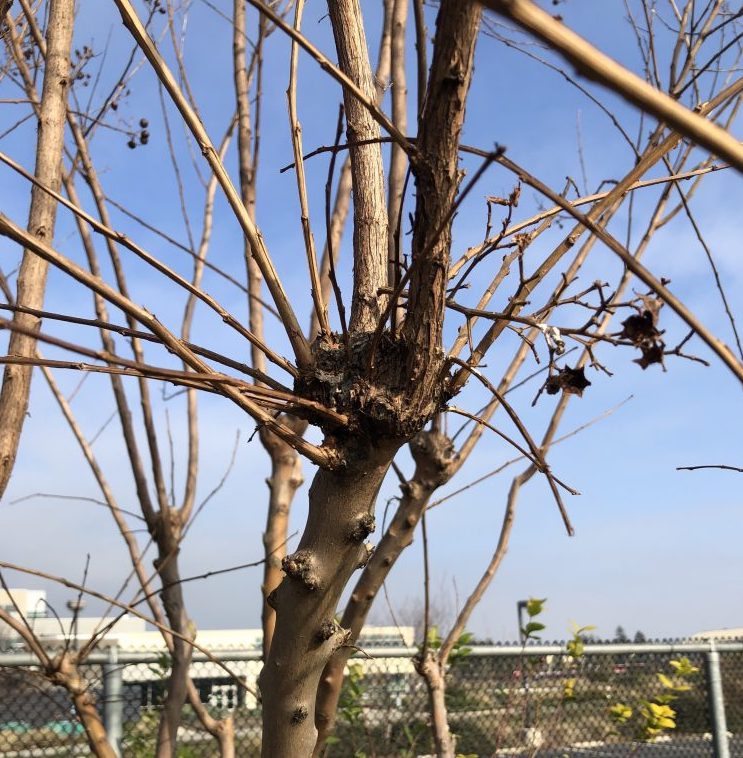
Crape myrtle "knuckle" growth
What do I do with the “knuckle” growth? It’s very common to see a crape myrtle that has been pruned back to the same node for years. You can see the two branches, emerging from the top of the knuckle that were left on last year. All of the other “sticky-wild” growth is from this year. There’s no way to stop this from happening if you leave those two branches. There are three schools of thought on the topic: one is leave it alone, two is prune to leave one to three well spaced branches and remove all the sticky growth and three is, prune off the knuckle and start over.
Method 2 : Leave a couple well-spaced branches

I removed all the sticky growth and selected one branch that was: outward growing, healthy, and in a good spot. Look below the pruned cut; there’s a darker “bud-swell” that should push out in the direction the bud is facing and grow how and where I want it to.
Here you can see a couple of branches before I selected the bud to prune to. Notice how there are several options (bud choices). Always select a bud that is facing away from the trunk and not growing towards another branch. They don’t both have to be the same size after you prune them. Best bud wins.
Method 3: Prune below the knuckle


The method I employ is sometimes driven by options and sightliness. My first instinct, after seeing this, was option number 3. I used an intentional heading cut to remove the knuckle and, hopefully, direct its growth. I went down about 8” from the knuckle bottom. Notice my bud selection (one that's facing outward).
Comparing Methods: 2 vs. 3
The detailed selective pruning of number two limits excessive wild growth while number 3 is quick and easy but could cause some wild growth. Number 2 takes, a confident pruner, 20-30 seconds each while Number 3 takes 2 seconds. Number 2 encourages “knuckling” while Number 3 removes them from the equation.
Dealing with competing branches

Spreading those two crowded branches apart shows off a weak attachment, flimsy wood and a reason to say goodbye to both of them.

Lagerstroemia can often end up like the photo below. Two branches, serving the same purpose, growing the same direction, and one is shading the other. I look to see which branch is the healthiest and most vigorous. Those factors being equal, I choose based on function. The lower branch actually impedes access around the tree. Let it go. Get your pruners in close without pruning into the branch collar (that’s the ridge where the two branches meet).


End Result
Here’s the two finished trees. All the seed pods are gone, all the “sticky” growth is removed and I tried to prune a “domed top” where possible. Notice that I employed both methods on each specimen.
How tall should the crape myrtle be when you’re finished? It depends on how big it was to start with, but ones of this age and size are now around 6’ (I’m 6’4”). I pruned at least 40% off of each tree. Not all plants can handle this, but crape myrtles are very forgiving and extremely hearty when recovering from a hard prune.
We can look next year at how each of the branches responds to the cut. Stay tuned!

